


If you’ve heard of WordPress, you’re probably aware that it’s a powerful content management system that allows you to create and customize your own website. The functions.php file in WordPress is a critical component of WordPress. This file serves as a repository for all of your theme’s functions, allowing you to add, modify, or remove functionality from your site.
We’ll look at what the functions.php file is, how to find and access it, and how to edit it to customize your WordPress theme in this article. This guide will provide you with the information you need to make the most of this essential file, whether you’re a beginner or an experienced WordPress user.
What is Functions.php File in WordPress?
Functions.php is a WordPress file that acts as a central repository for all the functions used in a theme. It is a PHP file containing code snippets that improve or change the functionality of a WordPress site. Consider it a toolbox that allows you to add and remove functionality and make other site changes.
The functions.php file is located in the theme directory and is loaded when the theme is activated. Because this file is specific to each theme, you must update your functions.php file if you change themes.
The benefit of functions.php is that it allows you to make changes to your WordPress site without editing the core WordPress files. This means you can customize your site without fear of breaking it or losing your changes if WordPress updates.
2 Ways of Editing the Functions File
It is easier to edit the functions file, especially using the standard text editor. However, before you start editing the functions file, you must create the current website’s backup. Creating a backup will be helpful to retrieve the unedited functions.php file in case you made any changes you didn’t want to.
Use WordPress Editor
The functions.php file in WordPress may appear intimidating, but it is actually a simple process. Here’s a step-by-step tutorial for editing functions.php in the WordPress editor:
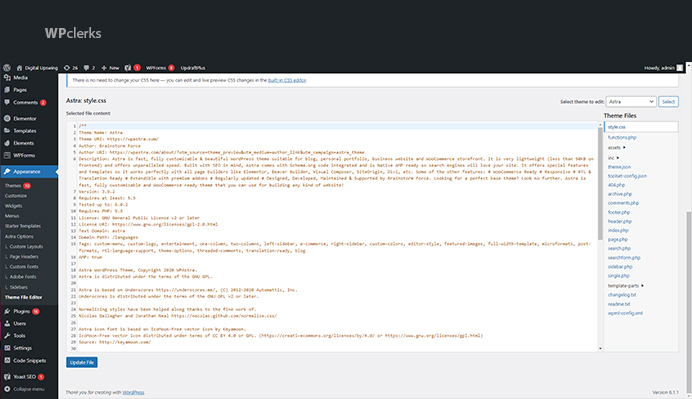
- Log into your WordPress account and go to Appearance > Theme Editor.
- Select functions.php from the list of theme files on the right side of the screen.
- Make the necessary changes to the file. You can add new functions or modify existing ones.
- When you’re finished editing, click the “Update File” button to save your work.
It’s important to note that you could break your site if you make a mistake when editing the functions.php file. So, before making any changes, always back up the file and test your changes on a staging site.
Using a child theme when modifying your theme’s functions.php file is also a good idea. This prevents your changes from being overwritten when you update your theme. Before editing the functions.php file, if you’re using a child theme, go to Appearance > Theme Editor and select your child theme.
Finally, editing the functions.php file is a simple process, but it is critical to proceed with caution and create a backup of the file before making any changes. You can avoid potentially breaking your live site by using a child theme and testing your changes on a staging site.
Accessing the File Using FTP
Another method for editing the functions.php file is to use FTP (File Transfer Protocol). To access the functions.php file via FTP, follow these steps:
- Install an FTP client like FileZilla, Cyberduck, or WinSCP.
- Using your FTP client, connect to your WordPress site. You’ll need your FTP login information, which you should be able to find in your web hosting account.
- Go to the /wp-content/themes/ folder.
- Locate the functions.php file in the theme folder you want to edit.
- Make a backup copy of the functions.php file on your local computer.
- In a text editor, such as Notepad or Sublime Text, open the functions.php file.
- Make the necessary changes to the file.
- Save the newly modified functions.php file.
- Using your FTP client, re-upload the updated functions.php file to the server. Make sure that the existing file is overwritten.

It’s important to note that you could break your site if you make a mistake when editing the functions.php file via FTP. Always make a backup of the file before making any changes, and if possible, test your changes on a staging site first.
Things You Can Do With the Help of WordPress Functions File
There are many different things you can achieve by editing the functions file. To help you with this, we’ll show you some changes you can make to your website by editing the functions.php file. You must copy the codes provided in each step below and paste the code on a new line at the bottom of the functions file to make the desired changes.
1. Adding Google Analytics to Your WordPress Site
Follow these steps to add Google Analytics to your WordPress site via the functions.php file:
- Log in to Google Analytics and add a new tracking code to your website.
- Copy and paste the tracking code into your clipboard.
- Navigate to Appearance > Theme Editor in your WordPress dashboard.
- Choose the functions.php file from the list of files on the right.
- Scroll to the bottom of the file and insert the following code:
function add_google_analytics() { ?>

  <script async src="https://www.googletagmanager.com/gtag/js?id=YOUR-GOOGLE-ANALYTICS-ID"></script>

  <script>

    window.dataLayer = window.dataLayer || [];

    function gtag(){dataLayer.push(arguments);}

    gtag('js', new Date());

    gtag('config', 'YOUR-GOOGLE-ANALYTICS-ID');

  </script>

<?php }

add_action('wp_head', 'add_google_analytics', 10);- “YOUR-GOOGLE-ANALYTICS-ID” should be replaced with your actual Google Analytics tracking ID.
- To save your changes, click the “Update File” button.
Once you’ve added this code to your functions.php file, Google Analytics will begin tracking visitors to your WordPress site. Log in to your Google Analytics account to view your site’s analytics.
2. Adding Estimated Reading Time for a Post
Follow these steps to add an estimated reading time to a WordPress post using the functions.php file:
- Navigate to Appearance > Theme Editor in your WordPress dashboard.
- Choose the functions.php file from the list of files on the right.
- Scroll to the bottom of the file and insert the following code:
function estimated_reading_time() {

    $content = get_post_field( 'post_content', $post->ID );

    $word_count = str_word_count( strip_tags( $content ) );

    $reading_time = ceil( $word_count / 200 ); // 200 is the average reading speed

    if( $reading_time == 1 ) {

        echo 'Estimated reading time: 1 minute';

    } else {

        echo 'Estimated reading time: ' . $reading_time . ' minutes';

    }

}- Save the changes to the functions.php file.
- Add the following code to your single post template where you want to display the estimated reading time:
<?php estimated_reading_time(); ?>This code will count the number of words in a post and estimate the reading time based on a 200-word-per-minute average reading speed. You can change the reading speed by modifying the $reading time variable.
3. Changing the Default Login Error Message
To modify the default login error message in WordPress, use the functions.php file as follows:
- Navigate to Appearance > Theme Editor in your WordPress dashboard.
- Choose the functions.php file from the list of files on the right.
- Scroll to the bottom of the file and insert the following code:
function custom_login_error_message() {

    return 'Your custom error message goes here.';

}

add_filter( 'login_errors', 'custom_login_error_message' );- “Your custom error message goes here.” should be replaced with your own custom error message.
- Save the modifications to the functions.php file.
This code adds a filter to the login errors hook, which allows you to customize the error message displayed when a user enters an incorrect username or password. WordPress displays the message by default “ERROR: An invalid username or password was entered. Have you forgotten your password? “.
4. Automatically Updating the Copyright Notice
Follow these steps to automatically update the copyright notice on your WordPress site using the functions.php file:
- Navigate to Appearance > Theme Editor in your WordPress dashboard.
- Choose the functions.php file from the list of files on the right.
- Scroll to the bottom of the file and insert the following code:
function update_copyright_year() {

    $start_year = 2021; // Change this to the year your website was first created

    $current_year = date('Y');

    if ( $start_year == $current_year ) {

        return $start_year;

    } else {

        return $start_year . '-' . $current_year;
    }

}

add_shortcode( 'copyright', 'update_copyright_year');- Save the changes to the functions.php file.
This code generates the [copyright] shortcode, which can be added to your WordPress site’s footer or any other appropriate location. The date() function is used by the shortcode to update the copyright year to the current year dynamically.
Follow these steps to add the shortcode to your site’s footer:
- Go to Appearance > Customize in your WordPress dashboard.
- Select “Widgets.”
- Insert a new Text widget into the footer area.
- In the text area, insert the following shortcode: [copyright].
- Changes should be saved and published.
Finally, using the functions.php file to update the copyright notice on your WordPress site automatically is a simple process that can be accomplished with just a few lines of code. You can keep your site’s copyright notice up to date by following these steps and customizing the code with your own start year.
5. Removing the WordPress Version Number
Follow these steps to remove the WordPress version number from your site using the functions.php file:
- Navigate to Appearance > Theme Editor in your WordPress dashboard.
- Choose the functions.php file from the list of files on the right.
- Scroll to the bottom of the file and insert the following code:
function remove_wordpress_version() {

    return '';

}

add_filter('the_generator', 'remove_wordpress_version');- Save the changes to the functions.php file.
This code adds a filter to the generator hook, which is used to remove the WordPress version number from the pages’ source code.
6. Customizing Excerpts
Follow these steps to customize the excerpts on your WordPress site using the functions.php file:
- Navigate to Appearance > Theme Editor in your WordPress dashboard.
- Choose the functions.php file from the list of files on the right.
- Scroll to the bottom of the file and insert the following code:
function custom_excerpt_length( $length ) {

    return 30; // Change this number to set the desired length of the excerpt

}

add_filter( 'excerpt_length', 'custom_excerpt_length', 999 );

function custom_excerpt_more( $more ) {

    return '...'; // Change this text to set the desired read more link or leave it blank for no read more link

}

add_filter( 'excerpt_more', 'custom_excerpt_more' );- Save the changes to the functions.php file.
This code adds two filters to the excerpts on your WordPress site:
- The excerpt length filter lets you specify the length of the excerpt in words.
- The excerpt more filter lets you specify the read more link text.
By default, WordPress uses a length of 55 words for excerpts and displays a “Read More »” link.
7. Adding Custom Menus
Follow these steps to add custom menus to your WordPress site using the functions.php file:
- Navigate to Appearance > Theme Editor in your WordPress dashboard.
- Choose the functions.php file from the list of files on the right.
- Scroll to the bottom of the file and insert the following code:
function register_custom_menus() {

    register_nav_menus(

        array(

            'header-menu' => __( 'Header Menu' ), // Change this text to set the name of the menu

            'footer-menu' => __( 'Footer Menu' ), // Change this text to set the name of the menu

            'sidebar-menu' => __( 'Sidebar Menu' ), // Change this text to set the name of the menu

        )

    );

}

add_action( 'init', 'register_custom_menus' );- Save the changes to the functions.php file.
This code adds a new function called register custom menus to WordPress, which registers three custom menus: a header menu, a footer menu, and a sidebar menu. You can change the text in the code snippet to change the names of these menus.
After you’ve added this code to your site, you’ll be able to add new menus to your WordPress dashboard by going to Appearance > Menus. Then, using the appropriate menu location in your theme, add these menus to your site’s header, footer, or sidebar.
alsoRead
Final Words
In conclusion, the functions.php file in WordPress is critical for customizing and improving the functionality of a website. Readers can better understand the functions.php file and its usage by reading this article. This article covers a variety of topics that can help readers make the necessary changes to their site’s functions.php file to improve their site’s performance and user experience, such as adding Google Analytics to a WordPress site, customizing excerpts, removing the WordPress version number, changing default login error messages, and registering custom menus. Readers can easily modify the functions.php file to fit their needs and create a more personalized website by implementing the code snippets in this article.
If your issue is still unresolved, don’t hesitate to get in touch with WPclerks, a WordPress support service providing company. We are available to help by taking care of your one-time tasks and WordPress Support and Maintenance quickly and easily. Forget about hours spent searching for solutions yourself.
Frequently Asked Questions (FAQs)
How do I access the functions.php file in WordPress?
The functions.php file can be accessed through the WordPress dashboard by going to Appearance > Theme Editor and selecting the functions.php file from the list of files on the right-hand side.
What are some common modifications that can be made to the functions.php file?
How do I access the functions.php file in WordPress?
The functions.php file can be accessed through the WordPress dashboard by going to Appearance > Theme Editor and selecting the functions.php file from the list of files on the right-hand side.
Is it safe to modify the functions.php file?
Modifying the functions.php file can be safe as long as the changes are made carefully and with a solid understanding of PHP programming. It is always a good idea to make a backup of the original functions.php file before making any modifications and to test the changes first on a staging server before implementing them directly on a live site.